
 There are several challenges to teaching online, and one of the most obvious to those who normally teach in the classroom or studio is how to replicate the use of blackboard or whiteboard online.
For some this will be writing, for instance maths or chemistry equations, for others it is drawing; either diagrams/graphs or something more creative.
Today, we are going to look at the three main types of interactive tools which can be used to easily write or draw online in your presentations. You will quickly see that there is no ‘one-fit’ answer which works for everyone. It really depends on exactly what you want to do, what tools you feel most comfortable using and of course, the depth of your pocket.
Next week, my colleague Adam Harvey will take a more in-depth look at working with visualisers, including some demo videos he has made with them.
Graphic Pad/Tablet with Stylus or Pencil:
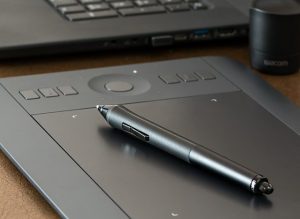
The main provider of these is Wacom, who produce a range of tablets, from around A6 up to A3 in size, with the most advance including a monitor within the tablet to allow you to actually write directly onto the screen. Prices vary from around £50.00 to upward of £3,000.00
These will connect directly via USB to either PC or Mac and can use computer software such as Autodesk Sketchbook or Windows Ink Workspace to allow you to draw or write directly onto the page.
Working with a Tablet will mean one extra bit of gear to have on your desk, but the drawing experience is relatively pleasant. The more expensive version offers more sensitivity in the stylus, with more flexibility in line width and pencil angle.
At the cheaper end you get a small pad and stylus, which allows you to write directly onto your screen. Writing with a stylus is much easier than a mouse, but it still takes some time to master. You can write into a window or whiteboard, or you can write over other programs, however the performance will vary a great deal with the software used. Generally it is easier and looks better when using sketching software rather than simply using the whiteboard in Zoom or MS Teams.
Examples include:
- Simple Graphics Pad: Wacom One CTL-672-N Medium around £60.00
- Pad with integrated screen: Wacom One Creative Pen Display around £360
Graphics Pads are the best tool for people who want to interact with software on their computer; to draw onto other images, create graphs or diagrams online inside other software. They normally work best for those who have reasonable pen control and can draw well.
Visualisers:
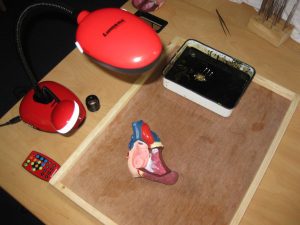
A visualiser is simply a modern digital version of the classic ‘Overhead projector’. At its most basic, it is simply a webcam on a stand, placing the camera above a desk, which allows you to capture a pen and pad, or a transparency on a light desk.
This will not allow you to interact with any other software nor to draw into any software, it will only provide a direct copy of whatever you write/draw on paper/film on your desk. It allows you to stay in the analogue world of good old pencil on paper!
It is however very simple to operate and is easily used by anyone who can write or draw on paper, it offers the smallest learning curve to use and is relatively cheap. Cheap ones are nothing more than a webcam on a stand. More advanced versions have lighting and allow you to zoom.
A visualiser can also work well for people who want to show examples of small items, which can be put on the table under the camera.
Examples include:
- Basic Visualiser: HUE HD Pro Document Camera at around £60.00
- Advanced Visualiser Ipevo VZ-R Around £200.00
Visualisers are best for those who are used to working on paper and feel comfortable doing this. They are good for anyone who struggles with technology; they are simple to set up and use. They don’t integrate with other software, so simply provide another video channel with the content on it. Also good for sharing other small 3d items on the desk. Good for anyone who remembers working with ‘Overhead projectors’ with any fondness.
Tablet computers with Stylus/Pencil (Apple iPads, Microsoft Surfaces and others):
 A tablet is in effect a mobile computer with a touchscreen that allows you to write on it with a Stylus/Pencil. These tend to be the most expensive option as you are also including a computer as well as an interface to support drawing/writing. They are however a popular and good way of presenting online, as you can run the whole session directly from the tablet.
The main advantage of working this way is simplicity. Everything is on one place, in your tablet computer and you can run your presentation, make your recording and write/draw, all from the same device.
Having said this, this approach is arguably less versatile and is certainly much more expensive, unless it is a replacement for your normal computer.
Examples include:
Best for those who want to keep things simple and are happy to work from a tablet, or those who have already decided to convert to working on a tablet for all their computer needs. It is however expensive.
If at all possible, we would always recommend that you try out these technologies before making your decision. They can all work, but some are better in one way and some another. The trick is to find out what works best for you.
If you would like to learn more, please do get in touch with Digital Education at digitaleducation@plymouth.ac.uk